26 December 2017
Setting the Stage
Mr. Robot is an awesome show on the USA network with some awesome technical consultants. The season 3 finale ends with Mr. Robot (a delusion and dissociative personality of the protagonist, Elliot Alderson✪If that’s not clear, think of Mr.Robot as Tyler Durden and Elliot as Ed Norton in Fight Club. If I spoiled that for you too, you might be beyond saving..) revealing how he hid RSA keys that were used in a cyberattack that encrypted America’s bank records (among other things). In this post, I’m going to go over how he managed to hide the keys in the way he did, and offer some viable alternatives.
Here’s how Mr. Robot explained to Elliot how to retrieve the keys:
On the night of the hack, I transfered the keys from the arcade to a remote virtual machine on our box at home. I then burned it to a CD. You’ll find the seed data and the algorithm embedded in those pictures. You’ll know the one. With those two pieces you should be able to regenerate the keys used to encrypt all of E-corp’s data. And like that, you can make it like 5/9 never happened.
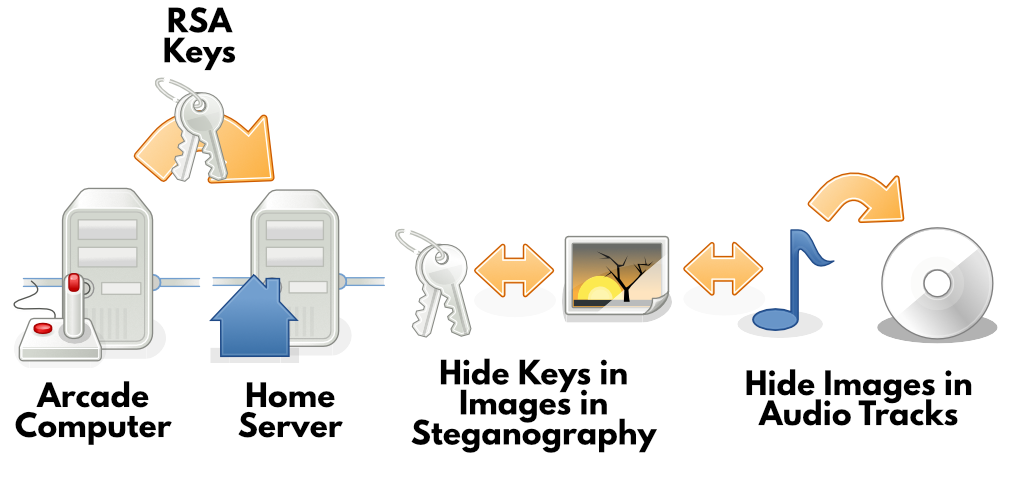
That’s a big chunk of dialog, so let’s make a little diagram of what happened the faithful night of the attack:
There’s also a Super 1337 Hacker Console Scene™ that plays during Mr. Robot’s explanation where you can see the commands Elliot uses to uncover the RSA keys. You can see them in the still below:

But that’s tiny, so here’s a transcription (don’t worry if you don’t know what’s going on with all this, we’ll go through it step-by-step in the next section):
root@mbox~# python ~/lsb.py analyse IMG_5527.jpg &
[2] 10808
[+] Image size: 4608x3456 pixels.
root@mbox~# python ~/lsb.py analyse IMG_5528.jpg &
[3] 70055
[+] Image size: 3000x2000 pixels.
root@mbox~# xxd -l 256 IMG_5528.jpg
(Cool looking, but unimportant hex dump)
root@mbox~# cp IMG_5528.jpg ~/IMG_5528_copy.png -o outfile
root@mbox~# stepic -d -i IMG_5528_copy.png -o outfile
root@mbox~# cat outfile
from Crypto.Protocol.KDF import PBKDF2
from Crypto.PublicKey import RSA
import getpass

infile = raw_input("File: ")
f = open(infile, 'r')
password = getpass.getpass()
f.seek(1024)
salt = f.read(32)

master = PBKDF2(password, salt, count=10000)

def notrand(n):
    notrand.i += 1
    return PBKDF2(master, str(notrand.i), dkLen=n, count=1)

notrand.i = 0
RSA_key = RSA.generate(4096, randfunc=notrand)
print RSA_key.exportKey()
root@mbox~# mv outfile keygen.py
root@mbox~# python keygen.py
Input filename:
The Break-Down
Hiding Data in Audio Files using DeepSound
The first thing Elliot does is pop the audio disk into his computer and uses what looks like, at first glance, some seriously fake CSI:Miami-grade software that has an “Extract secret files” button and show audio tracks on the left and image on the right.
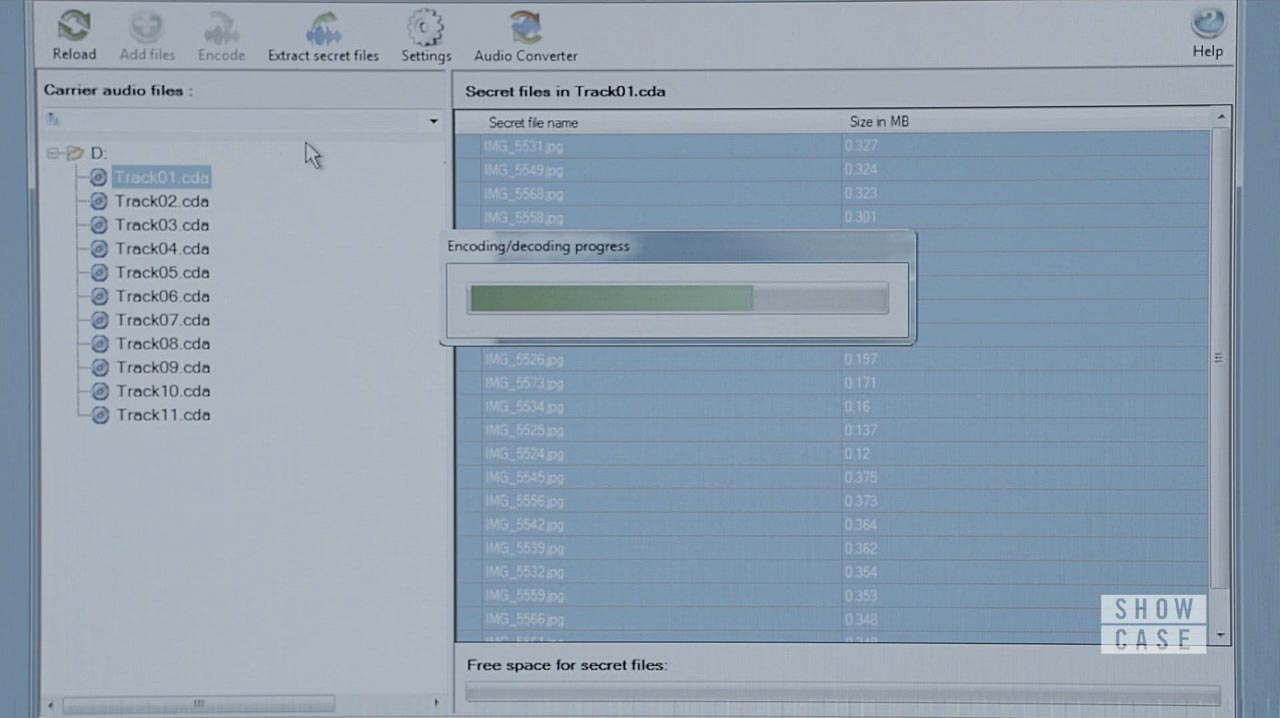
Except, the software is very real. A quick internet search will show you that Jozef Bátora’s DeepSound program matches the GUI and functionality of Elliot’s mystery software.

I frankly haven’t a clue how this works, and DeepSound is proprietary software, so I couldn’t go source-code spelunking even if I wanted to. I’m sure there is some good literature on the topic, but I’m calling that out-of-scope for this post.
Hiding Arbitrary Data in Images using LSB Steganography
So now that Elliot has extracted a bunch of innocent-enough looking images from his childhood, he’ll now need to extract data hidden in them that he’ll need to recreate the RSA keys that have encrypted America’s bank-accounts.
If you’re not familiar with the concept of stegasaurus steganography, you might have already asked
yourself “what the hell do you mean he hid data in an image?”, well let me show you something that’ll
blow your socks off✪If you are familiar with LSB steganography, you might want to skip the
subsection..
The two images below look identical, but there’s actually a text file hidden in the second image that says “Attack at fawns”. You can extract this text file if you have the right tools✪I used OpenStego.com for this example, because it was the least troublesome method..
This is achieved by a technique known as “least significant bit steganography” which uses the right-most bit (or least significant bit) of the bytes that encode pixel colour in an image to hide data.
Colour values in pixels of most images are encoded by one 8-bit byte, which means the red, blue, and green value of pixels range from 0 to 255, indicating how red, blue, and green the pixel is. Because changing the last bit can only increment or decrement the colour value by a value of 1, the colour change is usually entirely imperceptible to the human eye. Here’s a schematic to show you how it’s done:

LSB embedding is a really cool technique in that it’s elegant and east to implement. It’s also, however, very easy to detect (see below) and very easy to destroy the message without destroying the image (by randomising or zeroing LSBs)✪I wonder if Facebook, imgur, etc… do this. Also too lazy to check..
Sniffing out Images that are Hiding Secrets
Mr. Robot tells Elliot (in a very meaningful way) that once he finds the images, he’ll “know the one”. Evidently, however, Elliot doesn’t recognise the image for it’s emotional significance, because he proceeds to analyse a bunch of the images for evidence of tampering.
To do this, Elliot runs an analysis of the LSBs of a bunch of the images, as evidenced by the graphs in the console still from eariler, which Elliot created by running the following commands:
root@mbox~# python ~/lsb.py analyse IMG_5527.jpg &
[2] 10808
[+] Image size: 4608x3456 pixels.
root@mbox~# python ~/lsb.py analyse IMG_5528.jpg &
[3] 70055
[+] Image size: 3000x2000 pixels.
Another quick internet search, and we find out that the tool Elliot used to analyse these images was a small python tool which goes by the misspelled name cloacked-pixel.
You can use tools like “cloacked-pixel” to analyse the LSBs of images you suspect have data embedded in them by looking for atypical patterns, like having an average value of 0.5. If you’re interested in learning more, check out this pre-print that reviews some techniques for LSB steganalysis.
Revealing Secrets Hidden in Images
Once sniffed out (the image is IMG_5528.jpg), Elliot uses another small python tool✪Elliot and
I share a love of the Python language. called stepic,
which encodes and decodes LSB embedded images.
It’s simple enough to decode the file using stepic. Elliot first copies the file✪Inexplicably changing
the extension from a jpg to a png. and runs the stepic on the copy, outputting the secret contents
of the image into a file with the inspired name outfile. The -d flag indicates we’re decoding an image, the -i
flag specifies the input, and the -o flag the output.
root@mbox~# cp IMG_5528.jpg ~/IMG_5528_copy.png -o outfile
root@mbox~# stepic -d -i IMG_5528_copy.png -o outfile
Protecting RSA Keys with Passwords using Deterministic PRNGs
Once Elliot uncovers the data hidden in the image, he uses the cat function to find out what goodies are inside.
This is what he finds:
from Crypto.Protocol.KDF import PBKDF2
from Crypto.PublicKey import RSA
import getpass

infile = raw_input("File: ")
f = open(infile, 'r')
password = getpass.getpass()
f.seek(1024)
salt = f.read(32)

master = PBKDF2(password, salt, count=10000)

def notrand(n):
    notrand.i += 1
    return PBKDF2(master, str(notrand.i), dkLen=n, count=1)

notrand.i = 0
RSA_key = RSA.generate(4096, randfunc=notrand)
print RSA_key.exportKey()
This code is not something I’ve seen before, but given password \(x\) it’ll always generate an RSA public/private keypair \(y\). Sorta like a hash function, but if the digest was also an RSA keypair.
It’s a method people definetly know of and it’s got some interesting properties. There are also some things I’d probably change about it, but more about that in a second
How does it work?
When generating an RSA key, you need to find large, random prime numbers. To do this, you need a random number generator.
In this snippet however, instead of using a random number generator, we supply the key generation algorithm with a function that takes a password, and using that password, creates random numbers in a predictable fashion. We call this a “deterministic pseudorandom number generator” (dPRNG for our purposes).
So, for example, given the password “hunter2”, our dPRNG function would always return the following random integers in the following order: \(5,1,9,7,\ldots\); whereas given the password “hunter3”, our dPRNG function would always return \(3,6,4,4,\ldots\) in that order.
In Elliot’s case, the dPRNG is implemented in the honestly named function notrand.
# initiate the counter at 0
notrand.i = 0

# derive a "master key" from a password and salt.
# (more about this later)
master = PBKDF2(password, salt, count=10000)

# our dPRNG function
def notrand(n):

    # increment the counter by 1
    notrand.i += 1

    # hash the "master key" by the current counter number
    # and return n bytes.
    return PBKDF2(master, str(notrand.i), dkLen=n, count=1)
Our dPRNG is just a hash function (in fact, a key derivation function) that takes a derived key (master) as it’s input,
and uses a counter as salt. The counter increments by one for each call to notrand, and that’s what changes the output
between calls in a predictable manner. The number of “random” bytes is determined by the dkLen (derived key length)
argument of the PBKDF2 hash function.
To derive the key used by the PBKDF2 function (i.e. master), the script prompts the user to input a password, and then
uses bits 1025-1056 (for a total of 32-bits) from an image as a salt. That’s implemented as follows:
# Asks the user for the path of the image
# we're using as a salt
infile = raw_input("File: ")

# open the image we just prompted for
f = open(infile, 'r')

# Asks the use for a password
# (uses a secure method)
password = getpass.getpass()

# skip to the 1024th bit of the image
f.seek(1024)

# read 32 bits from 1024 bits into the image
# those 32 bits are the salt we'll be using.
salt = f.read(32)
So now that we have dPRNG, we can generate a RSA private key as follow:
# generate a 4096 bit key using our dPRNG
RSA_key = RSA.generate(4096, randfunc=notrand)

# print out the private key to the console
print RSA_key.exportKey()
Why do it this way?
When wanting to hide the keys in the images, Mr. Robot would have had two main concerns:
- Making sure that the key isn’t too large to embed, since big files leave big tracks.
- Requiring a password to access the encryption key, since obfuscation is not strong security.
Normally, to satisfy concern #2, you just encrypt your RSA key with a symmetric encryption algorithm (typically AES-256), In fact, that’s how most people store their RSA keys on disk. The problem with this approach is that the RSA key Mr. Robot is hiding is 4096 bits (512 bytes). That size begins to approach concern #1 territory. Not to mention, you typically anticipate RSA key to be only a few sizes (1024, 2048, and 4096 in most cases), and knowing the size of the message makes the steganalysis a bit easier.
The approach Mr. Robot uses here kinda addresses concern #1, as the code to recover the key is 13% smaller than the actual key. That’s not a huge difference, but hey, it’s better than nothing.
Things I’d Change
Here are the things I’d have changed:
- Use Ed25519 instead of RSA. Ed25519 has the benefit of genertating much smaller private keys (99.21% smaller than a 4096-bit RSA key) and so are great for this purpose. You can encrypt the key with AES-256 and end up with a very small binary blob you can hide in an image. Binary blobs don’t explain themselves like python code, however, so that might be a downside. Also quantum concerns of using an eliptic-curve cipher, but blegh.
- Use a stronger key derivation function. PBKDF2 has a number of weaknesses. A far better choice would be Argon2, bcrypt, and scrypt; likely in that order. PBKDF2 is a NIST standard, but I think Mr. Robot is smarter enough not to concern himself with that.
Parting Thoughts
Mr. Robot’s technical consultants never fail to impress. Much like the Silicon Valley folk who train mobile deep learning networks that recognise whether an image is of a hot dog or not, tech talk in Mr. Robot is both fundamental to the plot, and grounded in reality. Non-technical crowds might not be able to point out what about the tech in their shows is snake-oil, but authenticity is like good cinematography… most people don’t know what makes for a good scene, but you just inexplicably end up having a better experience.
Also, just a disclaimer: don’t use LSB-embedding for anything that actually matters; it’s pretty easy to sniff out in most cases.
Changelog
- 2017/12/26 14:45EST — Transcription error (“C” to “seed”). Thanks \u\xybur.